A barcode and QR scanner
Hargapedia's scanner has been reading QR codes since January. This week's update lets it recognise product barcodes too, so you can scan something on a shelf and look up its prices.
There’s a small scan icon beside the search bar on Hargapedia’s home screen. It’s been there since January. Tap it and the camera opens, with a square in the middle and a yellow line moving up and down, waiting for a QR code.
With this week’s update, the same scanner can read product barcodes. Point it at the barcode on a packet of something, and Hargapedia looks up the product and shows you where you can buy it.
The camera library could actually read both types of codes from the beginning. What changed was what we did with the result.
Starting with QR codes
Every screen in Hargapedia has its own address. Product pages, campaigns, retailer minisites, My Inbox and even the scanner itself can be opened through a hargapedia:// link, or the equivalent path on hargapedia.app.
We’ve been using these deep links for a while. They let banners and push notifications take people directly to a particular screen instead of just opening the home page.
QR codes give us another way to use those links, particularly outside the app. We can put a QR code on a printed promotion or voucher campaign, and scanning it takes someone straight to the relevant page.
I built the scanner in January, and the QR code handling is fairly simple. Once the camera reads a code, the app takes the text and asks the phone whether it can be opened as a link.
If it can, the app opens it. Hargapedia links come back into the app through our registered deep links, while ordinary web addresses open in the browser.
Most of the work was around managing the camera.
A camera doesn’t just report a QR code once. As long as the code remains in view, it can keep reporting the same value many times a second. I added a two-second throttle so the handler doesn’t repeatedly try to open the same link.
The camera view is also unmounted before navigating away, which makes the transition smoother.
Then there’s camera permission. If someone has denied access, the scanner shows a camera-off icon and a button to enable it.
On Android, the button requests permission again. On iOS, it opens the app’s page in Settings, because iOS won’t show the permission prompt a second time. When someone returns from Settings, I check the permission status again myself, since the camera doesn’t always report that it has changed.

Reading product barcodes
The camera library has always been able to recognise product barcodes too. But until now, scanning one didn’t do anything useful.
A product barcode is a string of digits, not a web address. When we passed it to the phone to open as a link, the check failed, and that was the end of it.
We’ve now added another step to that flow.
When the scanned value can’t be opened as a link, the app treats it as a product barcode and sends it to our API to look up the corresponding product.
While the request is running, the hint beneath the scanner’s header changes from “Scan the code here” to “Scanning…”.
If Hargapedia recognises the barcode, a panel slides up over the camera. It shows the product’s photo and name, followed by its online prices, each with a Buy Now button linking to the retailer.
There are also two actions. Track Price adds the product to your list, while View More opens its full product page.
You can swipe the panel down to return to the camera and scan something else.
That means you can pick up a product in a shop, scan its barcode and check the prices we have for it without having to search by name.
When we don’t recognise the product
Of course, Hargapedia doesn’t have every product in its database.
If the barcode lookup comes back without a match, the app shows a dialog explaining that we’ve found a new product. From there, you can search for it by name instead or help us add it.
Adding a product opens a short form asking for its name, a photo of the front of the packaging and where you found it.
The photo is taken with the phone’s camera and uploaded directly to S3 using a one-off upload link provided by our API. The rest of the form goes to our backend with the barcode attached, so we have the information needed to add the product and start tracking its price.
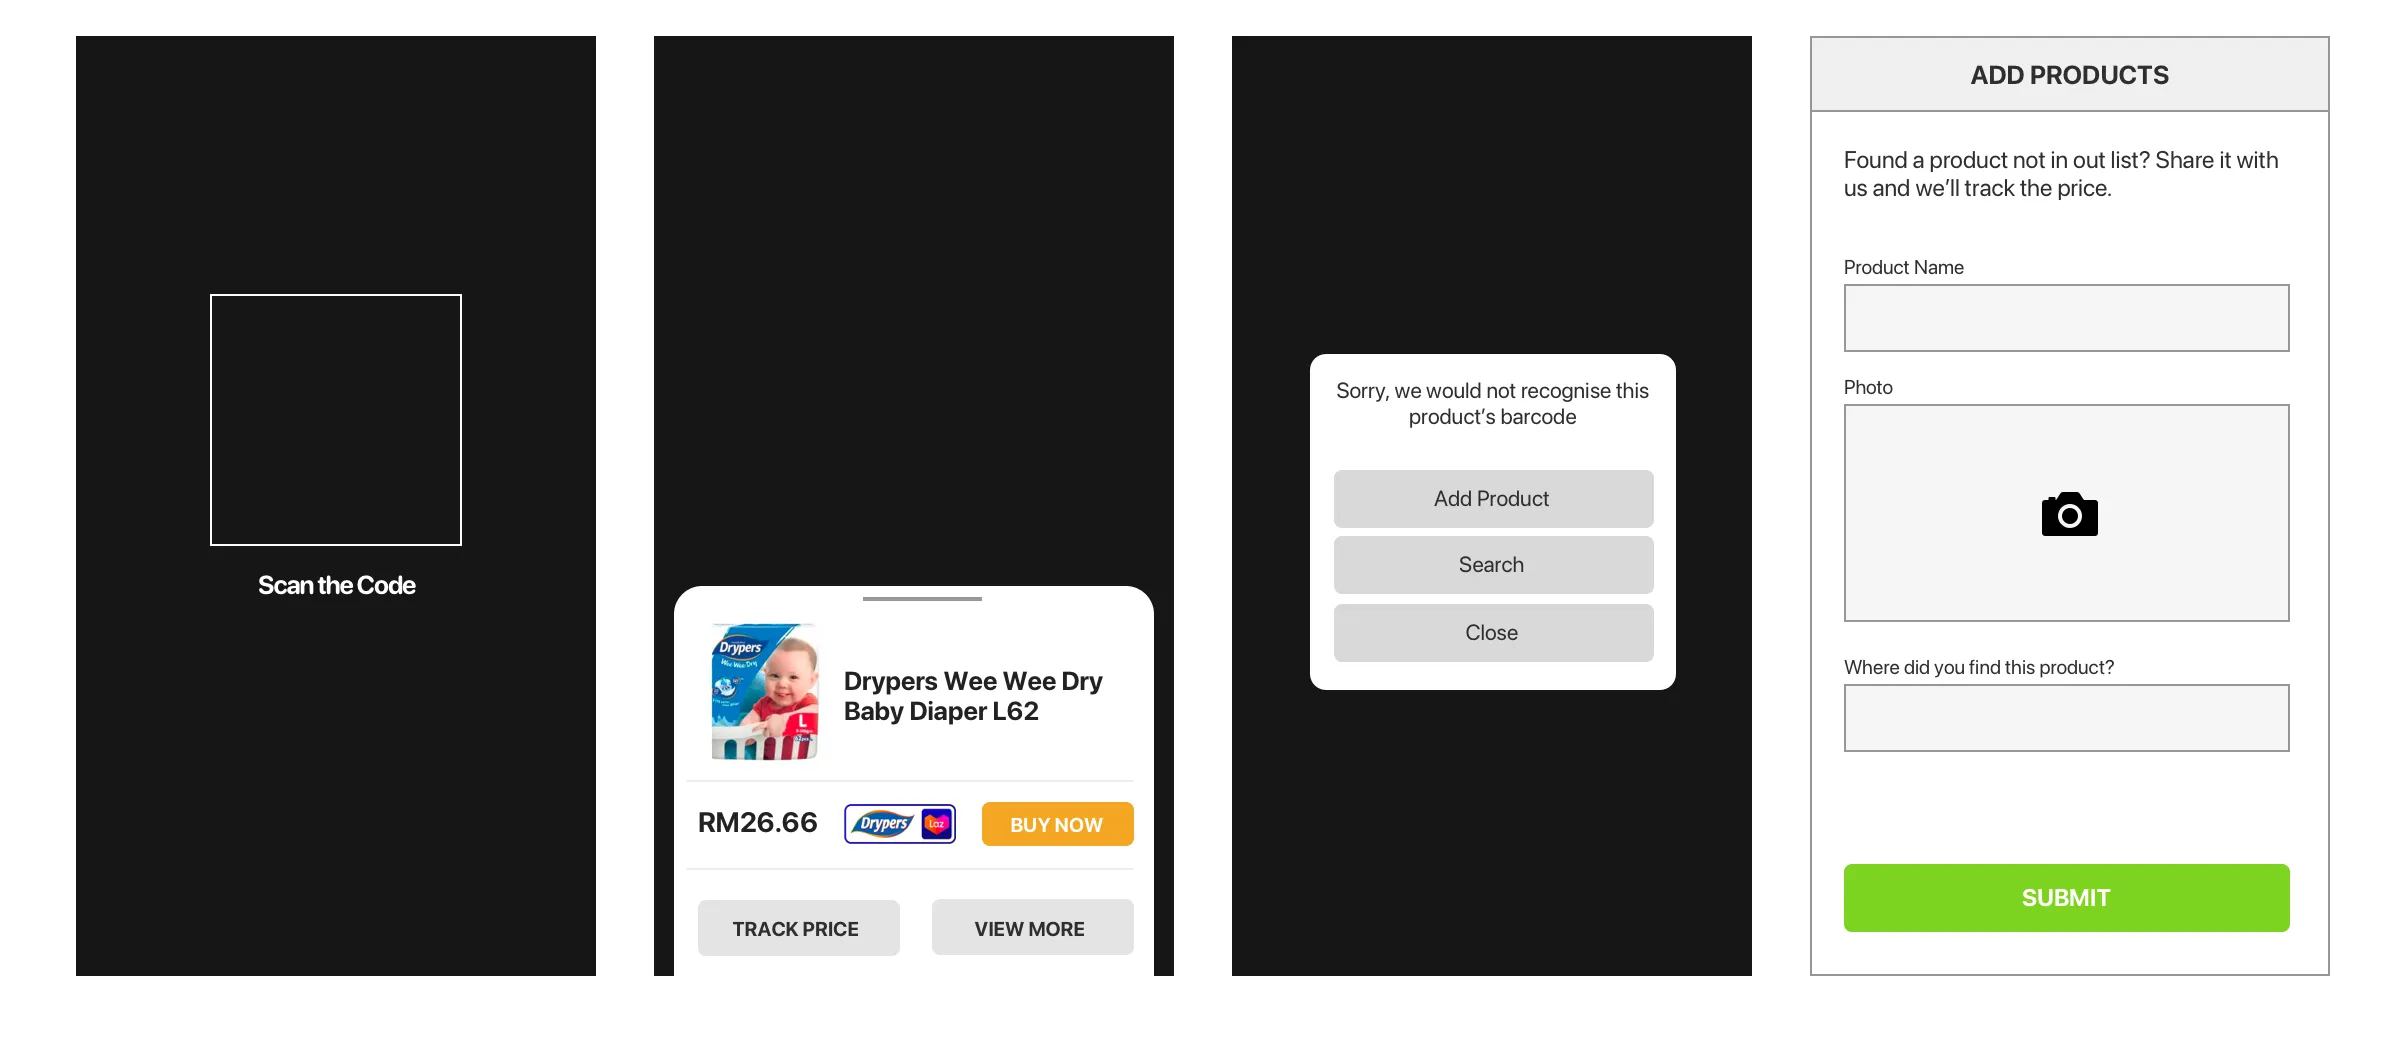
Both QR codes and barcodes now go through the same camera screen. The app first checks whether the scanned value can be opened as a link. If it can’t, we try looking it up as a product.
That lets us add barcode lookup without having two separate scanners on the home screen.